YOUR DRIVE, EXPLAINED
Kinetic Crossing: the complete guide
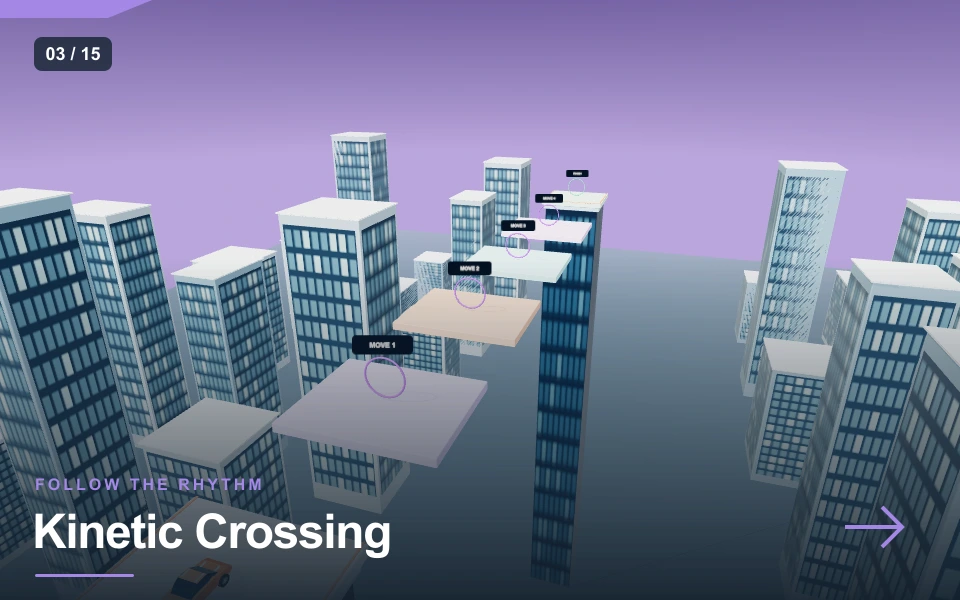
Kinetic Crossing is a sequence of four moving-platform landings above the city, followed by a final roof. The platforms slide sideways while you approach, charge and fly. A line that looks correct at takeoff can be wrong at touchdown. You need to predict where the target will be, choose a sensible jump power and actually land on each required platform in order.
| At a glance | Game details |
|---|---|
| Objective | Time four jumps onto platforms that slide sideways over the city. |
| Distinct mechanic | Timing + momentum |
| Session limit | 150 seconds |
| Control style | moving |
Controls & how to play
| Input | Action |
|---|---|
| W / ↑ | Accelerate |
| S / ↓ | Brake; keep holding to reverse |
| A / D | Steer |
| Hold / release Space | Charge a grounded jump, then release to launch |
| R / Recovery | Reset to the recovery point without spending a life or adding a time penalty |
| P / Pause | Pause or resume the active session |
Choose Low, Medium or High in the player. Low starts with calmer settings; High uses the base challenge described below. Changing difficulty starts a fresh run. Start and focus the canvas for keyboard controls; touch actions appear beneath it. You have three lives. A detected failure offers Continue, and Reset vehicle restores a safe position.
The platform is part of the moving problem
You begin on a fixed roof. Four square platforms lie ahead with open gaps between them; each moves left and right at the same general rhythm but with a different phase. Their positions therefore differ at any given moment. Numbered MOVE markers follow them so you can associate the progress display with the next physical surface.
The objective is to land on all four in order and then reach the fixed finish roof. Simply crossing the airspace of a platform or landing on a later one does not advance the current target. Wheel contact with the required body is the important event. You have 150 seconds and three lives. There are no lap times, opponent cars or traffic waves. Waiting for a useful position is a productive move when it leads to a landing you can actually hold.
Think about arrival time rather than current position
Watch a platform through part of its sideways movement before committing. Identify whether it is moving toward your chosen line or away from it. Near the extremes, its lateral motion slows before changing direction; near the centre, it travels more quickly. Those different moments alter how long a useful landing window stays open.
The car spends time charging on the ground and then time in flight. Aim at the surface’s expected position when the car comes down, not merely the location where you first saw the marker. A high charge creates a longer airborne interval, which gives the target more time to slide. If the platform crosses under you before descent, try a shorter flight or a later departure. If it is moving away during descent, wait for another part of its cycle instead of trying to force the same launch repeatedly.
Use the short platform as a preparation area
The moving surfaces are smaller than the fixed start roof. A long, fast run-up can consume the whole available platform before the jump is ready. Let the car settle, identify the next target and begin charging while it still has wheel support. Build only the forward momentum needed for the shorter gap, then release before leaving the edge.
After landing, lift off the accelerator so you do not immediately drive off the far side. The surface itself continues sliding beneath the car, so watch its edges while you prepare the next launch. The suspension and contact model can transfer some of that movement to the car, but the vehicle is not locked to the platform. A stopped car still needs attention. Use the target’s motion and the visible platform width to choose a departure window; do not assume that reaching a checkpoint has made the current position permanently safe.
Charge does not steer the flight
Hold Space to build grounded jump power and release to launch. The JUMP display shows the stored charge. Unlike Rooftop Leap’s larger roof gaps, this course uses shorter separations and a different jump-power range. Repeating the largest possible tower launch here can spend too long in the air or carry past a small target.
The accelerator and heading supply horizontal movement. Set the car’s direction before release, and remember that ground steering stops being effective once the wheels lose support. There is no double jump, platform magnet or midair snap-to-target action. If a landing misses sideways, inspect the target’s direction of travel and your original heading. If it misses along the route, inspect speed and release time. Treat these as separate errors. Changing power, throttle and heading together can hide which one actually caused the miss.
Ordered progress, recovery and the final roof
The platform counter rises only after a required landing. A registered platform becomes a checkpoint position for recovery, and the current progress stays within the active attempt. Because that surface continues moving, the checkpoint describes where the car can be recovered rather than freezing the platform’s motion for you.
A fall far below the course consumes a life. The game returns the car to the checkpoint while the mission clock keeps running. R recovery returns to the checkpoint without spending a life or adding a time penalty. After using either recovery, check the platform’s current position and take a moment to stabilise. The last move is onto a fixed roof marked FINISH. Completing four platform contacts alone is insufficient if you then fall short of that roof. Reach its surface near the marker while grounded to end the mission. A new restarted attempt begins again from the first fixed roof and clears all four contacts.
How to read a missed landing
A useful replay starts with a specific question. Was the surface underneath the car when it descended? If not, timing or lateral aim was wrong. Did the car reach it but bounce or drive away immediately? Then arrival speed and post-landing input deserve attention. Did the launch fail to happen at all? The wheels may already have lost support when you released.
Projectile-motion research explains the vertical arc, while the platform’s separate sideways motion changes the collision opportunity. The sliding motion here is a designed kinematic cycle, not a platform reacting to the car’s weight. It will keep following its path after impact. The game uses ordinary gravity, suspension and body contact for the vehicle, but it does not offer realistic engineering calculations for moving bridges. Use the repeated cycle as something observable and learnable, then choose your input to match it.
Build a rhythm without rushing every move
Practise the first moving target until you can land it twice with a similar launch. Spend an attempt watching its direction at takeoff and at touchdown; the difference is often more informative than the final score. On the next attempt, keep the charge and speed familiar but wait for a different part of the cycle.
Once the first contact is reliable, practise stopping on that surface and preparing the second. Resist the urge to chain every jump immediately. Different platform phases mean that the same delay between jumps can produce different landing windows. A deliberate pause may create an easier route. Pendulum Run offers another timing lesson with hazards on a continuous bridge. Rooftop Leap keeps the destinations still but changes their height and lateral placement. Choose the comparison that addresses your current difficulty rather than treating the shared car model as proof of identical rules.
Graphics, sound and fullscreen settings
Each moving platform has a distinct pastel surface and a marker that follows its lateral movement. The fixed roofs look more substantial than the sliding squares, helping you distinguish preparation areas from targets. The camera shows the car and the next stretch; watch actual edge positions as the target moves.
Sound begins after a player interaction. The shared audio system provides a synthesised engine layer, short action cues and background music. Music can be switched off separately, and volume or mute controls adjust the output. Use fullscreen for a larger view; where native fullscreen is unavailable, the expanded player keeps the scene usable. High HD increases rendering resolution and shadow detail on supported devices. Light reduces those costs on a slower phone without changing the objective. Pause before changing focus; the game also pauses when you leave the tab. Choose the setting that keeps your controls responsive rather than assuming the highest option improves the physics.
Pros & cons
What works well
- Targets keep moving during the approach and airborne phase.
- Four ordered physical landings reward anticipation.
- Short gaps use their own jump tuning and pacing.
Practical limits
- A checkpoint does not freeze a moving surface.
- A large charge can miss a small target.
- Steering corrections are limited after the wheels leave support.
Choose your next challenge
The shared player makes it easy to switch games, but each mission asks for a different decision. Compare the objective rather than expecting one score to mean the same thing across every mode.
| Game | Objective | Session |
|---|---|---|
| Kinetic Crossing | Time four jumps onto platforms that slide sideways over the city. | 150 sec limit |
| Rooftop Leap | Charge a jump and land on three different skyscraper roofs. | 150 sec limit |
| Pendulum Run | Pass three swinging wrecking balls and reach the far end of the suspended bridge. | 120 sec limit |
Frequently asked questions
Does touching any platform advance progress?+
Only the next required platform advances the sequence, and the check needs grounded wheel contact with its body. Flying across a marker or skipping ahead does not satisfy an earlier landing.
Why does a successful-looking line fail later?+
The target slides while you charge and fly. Its position at touchdown can differ substantially from its position at departure. Watch its direction of travel and aim for the expected arrival position.
Can I wait for a better platform position?+
Yes. The clock keeps running, but no rule forces immediate jumps. Waiting near a reversal can create a wider usable window. Stay alert to the edges of the surface supporting your own car.
What ends the mission after four landings?+
You must also reach the fixed finish roof while grounded near its marker. Four recorded moving-platform contacts are required, but the final roof remains a separate move that can still fail.
Final words
Kinetic Crossing rewards a measured attempt and a clear understanding of the current mission. Start with Low, practise one section at a time and use the reset control when you need a safe position. Watch what changed between attempts before adding more speed. The useful result is a technique you can repeat, with room to improve on the next run.